--> This personalization feature provides easy, faster way to customize Oracle apps forms with
minimum development effort.
--> The Form Personalization feature allows you to declarative alter the behavior of Forms-based screens like changing properties, executing built-ins, displaying messages, and adding menu entries…etc
Why personalization :-
Oracle Supports personalization unlike customization.
Personalizations are stored in tables rather than files.
Will not have a bigger impact when you upgrade or apply patches to the environment.
Can be moved easily through FNDLOAD from one instance to other.
Can be restricted at site/responsibility/user level.
Easy to disable/enable with click of a button.
Personalization will store who columns with which we have the ability to track who created/modified it where as in CUSTOM.PLL we don’t have that ability.
Can be applied to new responsibilities/users easily.
Can be restricted to function or form.
What can be done through personalization:-
Zoom from one form to another.
Pass data from one form to another through global variables.
Change LOV values dynamically
Enable/Disable/Hide fields dynamically.
Display user friendly messages when required.
Launch URL directly from oracle form.
Execute PL/SQL programs through FORM_DDL package.
Call custom libraries dynamically.
To create personalization for a particular function/form, first invoke the function/form in Oracle
applications.
Navigation: choose “Help -> Diagnostics -> Custom Code -> Personalize” from the pull down
Personalization Tables:-
All personalization’s that we have made to Oracle application forms will be stored in following
tables :
1. FND_FORM_CUSTOM_RULES
2. FND_FORM_CUSTOM_ACTIONS
3. FND_FORM_CUSTOM_SCOPES
4. FND_FORM_CUSTOM_PARAMS
5. FND_FORM_CUSTOM_PROP_LIST
6. FND_FORM_CUSTOM_PROP_VALUES
The Personalization form mainly contains four sections.
- Rules
- Conditions
- Context
- Actions

Rules:
- Contains Sequence, description of the rule. Level either Form or Function depends on requirement.
- Enable or Disable Rules using check box
Condition:
- Provide Trigger Event, Trigger Object, Sql statement in Condition.
- Processing mode: not in Enter-Query mode, only in Enter-Query mode or both
Context:
- Like profile options: Industry, Site, Responsibility, User
Actions:
- Property, Message, Builtin, Menu
1. Change Displayed data in LOV
Goal:
Change the LOV in “Supplier Name” field in the Find “Invoice Form (AP_APXINWKB)”
Navigation: Payables Manager > Entry > Invoices
Double Click it to open

In the first filed, Supplier Name change LOV In such a way that no one can see the TaxPayerID in LOV. It should be masked with *’s.
Navigation: Help Menu >> Diagnostics >> Custom Code >> Personalize

Enter the following information:
Seq: 5 Description: Disable Tax Payer Id
Level: Form Enabled: checked
Trigger Event: WHEN-NEW-FORM-INSTANCE
Processing Mode: Not in Enter-Query Mode

Click on Actions and enter the following.
Seq: 10 Type: Builtin Language: all
Builtin type: Create Record Group from Query
Argument:
SELECT vendor_name, vendor_number,
DECODE (active_flag, ‘Y’, ‘Yes’, ‘N’, ‘No’, ‘Yes’) active, ‘***’ num_1099,vat_registration_num, vendor_id, ”, ”, ”, ”, hold_all_payments_flag
FROM po_vendors_ap_v
WHERE num_active_pay_sites > 0 OR num_inactive_pay_sites > 0
ORDER BY UPPER (vendor_name)
Group Name: ERP_SCHOOLS_ALL_VENDORS_NAME

Now Create New Record with below information
Seq:12 Type: Property Language: All Enabled: Checked
Object Type: LOV
Target Object: INV_ALL_VENDORS_NAME
Property Name: GROUP_NAME
Value: ERP_SCHOOLS_ALL_VENDORS_NAME

Save it.
Click Validate
Click Apply Now.
Go to tools Menu >> click Validate All

Once it is successfully validated you are ready to go.
Click ok and close personalization form.
Close your find invoices form and invoices form completely.
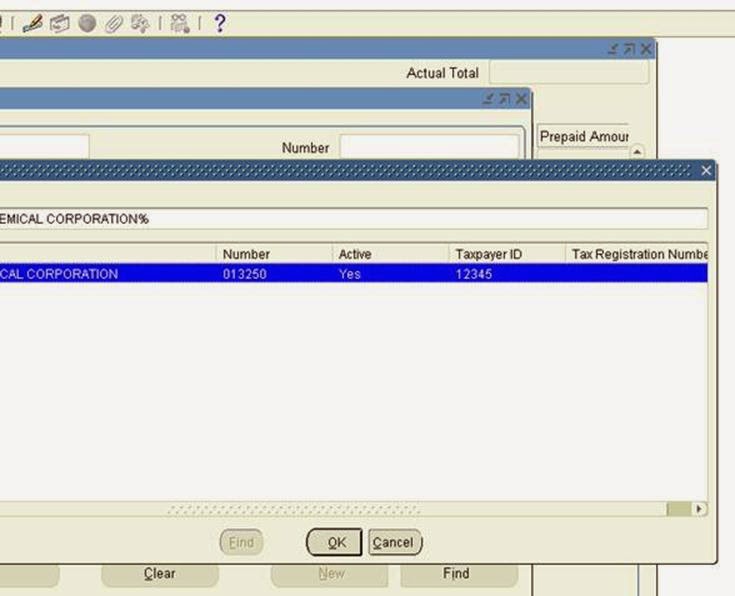
Open it again and click on Supplier name field LOV
Query any supplier. You will see your changes to the LOV as shown below.

Now
Taxpayer ID is shown as ***** instead of number
No comments:
Post a Comment